Friday 26 June 2015

Womens Shirt Refashion

One night earlier this week one of my daughters was distraught because an update on her mobile Minecraft program had altered a 'world' she had been building for well over a year.  I did my best to assure her it was going to be ok (but honestly, I couldn't promise this - Minecraft is a generational divide I cannot bridge, and I had no idea if it would infact be 'ok').  But I continued to console her, telling her she would work it out the following day when she had time to 'explore'  the newly altered world. It did turn out to be ok the following day, and all was well for her again.

But not for me, because here I am a few days later struggling to work out how to navigate my photo program after an update altered it beyond recognition.   So apologies in advance, as I struggle to work my way through the changes.  As such the photos on the steps taken to create this refashion are nearly non-existent and I will try my best to explain the steps I took to complete this project.


After my recent glut of grey winter clothing I headed to the opshop looking for colour on the discount rack.  

I found this large womens shirt for $1.


Isn't it lovely?

Remember this refashion where I turned a maxi dress into a jumpsuit.  Despite that being by far my viewed post thanks to lots of shares on Pinterest, I decided that jumpsuits just weren't my thing and turned that badboy into the most comfy pyjama pants ever.  which clash nicely with this this floral monstrosity.


 I had originally planned on making this shirt a skirt.  But after removing some rather large shoulder pads, I realised enough length had been added to be able to turn it into a winter mini dress....

And this is where the photos dry up, but in a nutshell I did the following steps to convert this to a dress.


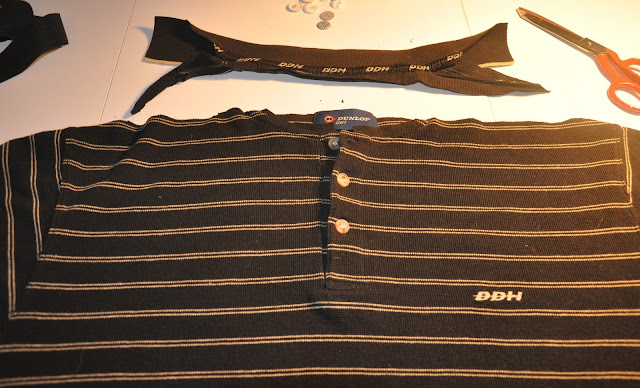
1.  I cut off the collar because I don't think collars suit me.

2.  I reversed the shirt - the back of the shirt became the front of my dress because I quite liked the pleat thing the shirt had at the back as a front detail on the dress.
Because this fabric has a lot going on it was quite hard to photograph - but if you squint you might see the pleat I'm talking about.


3. I sewed the button panel closed and then cut the panel off.
This photo shows the seam where the bottom panel used to be.

  I then used the button panel I had removed to give the neck line a more finished look.
I did this by first removing the buttons from the panel, then folding the button panel over the top of the raw edge of the neck line where the collar had been cut off, then sewed it in place.


4.  I took in the sleeves for a narrower fit.


5. And I also took in part of the bodice to create an A-line fall on the dress.
You can see in this photo the new A-line shape, which I created by taking the dress in under the arms and gradually tappering it out to the original width of the shirt near the hem of the dress.


6. I then used the collar I had removed to create a detail on the back of the dress so it was less 'sack' like.
To do this I sewed the raw edge of the collar under and faced it into the back of the dress, and adjusted the length until I liked the way it sat while the dress was on.  I didn't sew this in place across the width of the back, only at the two ends as this allows more movement and comfort when wearing the dress.


The first day I wore this dress I had so many positve comments from all sorts of people.  I must admit I loved saying it only cost me $1.


The back.


Some people say 'older' women shouldn't wear minis, and while I prefer not to wear them unless I've got some leggings on under, this has more to do with me being worried about wardrobe malfunctions than me thinking it is age inappropriate.


This dress reminds me a bit of a 60's tunic, I even seem to be doing a 60's style pose here.


Trying to look natural.


I even quite liked it teamed with this refashioned cardigan.


Refashioned Dress: thrifted $1, Leggings: old wardrobe item, Dr Martens: Gumtree $30.


Saturday 20 June 2015

Mens Teeshirt to Pencil Skirt

A few weeks back I was gifted some mens teeshirts.


I decided to turn this one into a pencil skirt.


The first thing I did was cut off the collar.


Next I laid the teeshirt out flat on the floor to work out where the skirt edges would be.
Because I didn't have any other pencil skirts, I grabbed a pair of jeans to use as a guide to work out the skirt edges.


After sewing along the chalk lines I cut off the bits I didn't need.

After this I tried it on to check the size.  Because the fabric was much stretchier than I initially realised, I had to take another couple of inches from each size to make it fit properly without it bunching up along the side seams.


Once I got the size right, I sewed the side seams flat to stop the sides of the skirt from looking lumpy when it was on.


Then I got this elastic waist band that I had in my sewing stash from a previous project.


Pinned it in place.


And sewed it onto the top of the skirt (using a large zigzag stitch to allow the elastic to stretch).


Pencil Skirt done.


Being modelled with...


Awkward poses.

Right... so I obviously wasn't in the mood for posing for photos on this day.

Teeshirt refashioned to Pencil skirt: gifted $0, Blue Teeshirt: gifted $0, Blue and White Stripped top: old wardrobe item, Dr Marten Elena Boots: Gumtree.

Friday 12 June 2015

Another WInter Tunic Refashion

A few weeks back I unearthed a box of my old winter clothes, which contained FIVE grey winter tunics.  Most of which had short sleeves, which just isn't very practical for winter.


The first one to get refashioned from that stash of grey was this one above.  
To see how that one turned out check it out here.


But the grey tunic I tackled this week, was this one.

The first step, which I forgot to take a photo of, was cutting 14 inches from the original length of the tunic.


 From the 14 inces I chopped off, I cut 4 seperate pieces from which I would create the sleeves for my re-jigged tunic.


I sewed the four bits together to create two pieces from which I would make the sleeves.

NB: When I sew any fabric that has a bit of stretch, I use a small zigzag stitch as it allows the fabric to continue to have a bit of stretch after it has been sewn.


Then I chopped off the bits with pockets because I didn't want pockets on my arms.


And pinned (and then sewed) the new 'sleeve' pieces onto the old cap sleeves.


Once it was sewn on it looked like this... not quite a sleeve yet.


So I  turned it inside out, then pinned and sewed the edges together to complete my sleeves.


See... sleeves.
And after a bit of finishing off (read zigzagging) of raw edges this tunic was done.


Another tunic to crop top.  This time with sleeves added.

Although I could have, I didn't hem the bottom of the top where I cut length from the original tunic (the raw finish kind of reminded me on one of my favourite tops from the 90's).  Instead, I ran a stitch all the way around the bottom of the top a couple of millimetres up from the raw edge to stop it fraying too far.  


That raw hem is a little wobbly, but I like that it is imperfect.


Sleeves that are now not only long enough to keep my arms warm, but also my hands on a chilly day.


I do like the new style of this top, but I am craving some colour in my winter wardrobe which still seems to have way too much grey and black... Hopefully there will be some some colourful winter refashions in the not too distant future.

Refashioned Tunic: $0 old wardrobe item, Dress: $0 gifted, Boots: Dr Marten from ebay a few years ago, Black Leggings: old wardrobe item.


Sunday 7 June 2015

Teeshirt Refashion

If you have a look on Pinterest you will see all sorts of amazingly creative teeshirt refashions, this is not one of them - this is a pretty basic teeshirt upcycle project that only takes about 10 minutes and anyone could do.


It's that time of year again where all my 'before' photos include me in my tatty old Ugg Boots.


Showing my age here... on Pinterest this would not just be called a 'teeshirt' that happens to have a picture on it (thats what I would have called it).  It is actually a 'Graphic Tee' - see how it has a 'graphic' on it :-P


Anyways, it was a tad too big for me so I grabbed this purple top that I wear to bed to use as a guide for my alteration.


I pinned along the chalk lines.

Note to self - I really need to get some proper sewing chalk, the kids jumbo chalk I use just isn't that easy to work with.


Sewed along the chalk lines.


Chopped off the extra fabric, and ta-da I have myself a new 'graphic tee'.


Perfect for casual sunny winter days, if you happen to live somewhere that has a subtropical climate that is.


I chose not to alter the sleeve length as I quite liked this length for a winter tee.


Layered with a casual thrifted hoodie.


THRIFTED AND GIFTED OUTFIT - $11
Teeshirt: gifted, Jeans: thrifted and refashioned $4, Shoes: thrifted $4, Hoodie: thrifted $3.