But last weekend I felt the deperate need to tackle (and actually finish) a furniture project after ongoing frustration with our too small 4 seater kitchen table.

I found this 6 seater table as a freebie on a local Facebook group a month or so ago, and had had it sitting in bits in my project room ever since.
I didn't love it (or even like it for that matter), and initially I didn't plan on keeping it. But it was the perfect solution to our small table dilemma, so a makeover was in order.
So I dragged the table out into the yard and gave it a good sand.
This gross looking jar is a vinegar and steel wool wood stain that I had had on the brew ever since I got the table. Basically I stuck some steel wool and plain old white vinegar into a jar and left it to fester for a few weeks. And once the table top was well sanded it was time to give the concoction a try.
I wiped it on with a rag, and it gave a natural aged look to the otherwise pretty bland pine table top.
NB: I would recommend wearing gloves if you are going to give this a try - my hands were stained a weird yellowy/brown colour for a couple of days after staining this table.
Once the stain had dried, we all mucked in and waxed the top of the table.
I used this wax that I got a few months back from Masters.
Once the table top was waxed it was time to move onto the legs.
I intended to paint them, so I had to sand off the high gloss vanish so the paint would stick. But because the legs were turned, the sander wasn't really suited to this job, so I had to do it by hand :-(.
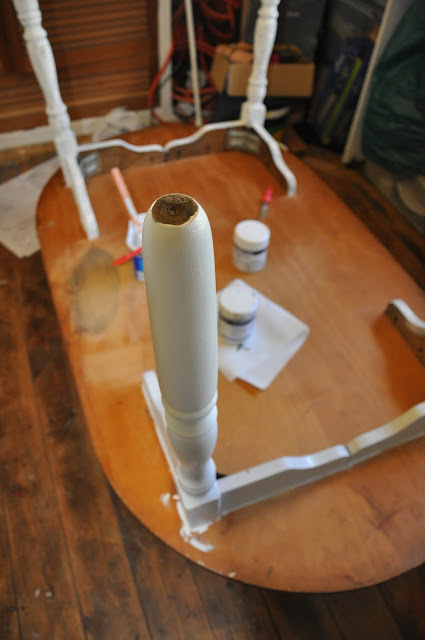
I attached the legs to the table and took it inside where I turned it upside down to make painting easier, and then undercoated the legs.
I wanted to give chalk paint a go because I had read so much about them on other peoples blogs. But because I am far to impatient to wait for paint to arrive in the mail after ordering it on the internet, I decided to use the DIY bi-carb chalk paint method outlined on this blog here.
I used acrylic sample paints we had left over from other projects, and because I didn't want plain white legs on this table, I decided to mix up a light grey colour.
Once my acrylic white and black paints, and bi-carb were mixed together this is what my 'diy chalk paint' looked like.
I did 2 coats of my chalk paint, and becasue the DIY bi-carb chalk paint tends to be a little grainy after the final coat I sanded the legs lightly (I didn't want to create a distressed look) with 'medium' grade steel wool.
After the grainy bits were knocked off I applied 3 coats of the same wax I used on the top of the table to seal the paint (I followed the packet instructions and left 24 hours inbetween each application).
This is how the table looks now that it is finished, I think it looks much better...
The chairs are still a work in progress, and at this stage my 6 seater does not have 6 seats, but I'll get there eventually.
My 10 year old made the paper flowers in the old teapot, I think they are lovely and add a much needed burst of colour.
I wish that I had a lovely home to do this piece justice, but alas with us about to embark on some much needed major renovations, the house is looking pretty shabby... but hopefully not for too much longer :-).
I'm still not sure if this 'farmhouse' look is really my thing, but I think it looks pretty good for a freebie.


This looks awesome :)
ReplyDeleteThanks Jaime :-)
ReplyDelete